2D to 3D Depth-Based Conversion


An important foreword...
The Skilled Stereographer: The success of a skilled stereo photographer comes down to a deep understanding of the many principles involved. At its most refined, two matched cameras are used to capture separate photographs of the same object from slightly different angles from one fixed viewpoint. The cameras are typically spaced at roughly adult eye 'interocular' distance apart. This horizontal offset produces a binocular disparity which together with other information in the scene, including the relative size of objects, occlusion and shadows, is processed by a viewer's brain to create depth perception.
Interaxial: The distance between the left and right cameras is called the 'interaxial'. By adjusting the interaxial distance between the cameras, a skilled stereo photographer is able to dynamically increase and decrease the depth in a scene. The wider the interaxial, the more depth is captured.
Depth budget: Each scene captured has a maximum amount of usable depth within which to create effective 3D. The depth budget is calculated as a percentage between the left and right eyes separation in relation to viewing screen width. Too much depth in a shot (too much interaxial) is very difficult or sometimes impossible to fix in post-production.
Stereoscopic Camera Rig: A skilled stereo photographers camera rigs must have matching geometry, exposure, colour balance, focus and synchronized zoom. In a typical 'side-by-side' rig the cameras are mounted parallel. Due to the physical size of the cameras and lenses, it is difficult to achieve small interaxial separation with a side-by-side rig, so it is mostly suitable for medium and long shots. Mirror rigs or beam splitter rigs place one camera horizontally, the other vertically. A semi-transparent mirror reflects the scene into the vertical camera while allowing the horizontal camera to see through the mirror. The interaxial distance on a mirror rig can be as small as you want, even down to zero interaxial, so the mirror rig is very suitable for close shooting.
- When capturing a real digital stereoscopic photograph, the skilled stereo photographer must control for the following sources of error:
- Vertical misalignment: With a vertical misalignment, our eyes have to move vertically apart to fuse the photographs. This is an unnatural movement for our eyes and can be very uncomfortable.
- Rotational misalignment: Camera misalignments can also be in the form of rotation errors (pitch, yaw and roll). These are generally most apparent on the four edges of the photograph.
- Zoom mismatch: If the cameras are at different focal lengths, it results in a zoom/size mismatch between the left and right eye photographs.
- Colour and Exposure difference: The cameras exposure and colour balance should be the same.
- Retinal rivalry: When something appears only in one eye, the viewer cannot reconcile the photographs. This can occur in the form of reflections, glints, lens flares & motion artefacts due to synchronisation error between the cameras.
- Focus wander: Most small camera rig errors can be corrected in post-production. Focus errors cannot be corrected in post-production.
2D to 3D Conversion: Real-time 2D to 3D Conversion was introduced with the arrival of 3DTV where its promotion was constrained by the lack of stereoscopic content. There are 2D to 3D conversion products such as DDD's TriDef, 3D player, and 2D to 3D software embedded in LG's 3DTVs. The aim of this work was to convert 2D video into 3D video. The 2D to 3D conversion technology developed enriched stereoscopic content availability, and supported the development of the stereoscopic display industry at that time, just as it is now being used to support the development of the auto-stereoscopic display industry today.
Inherent Limitations: 2D to 3D Conversion generates a depth map from content where there is no direct depth information and uses algorithms that use focus/defocus and geometric cues such as linear perspective, known size, relative size or height in picture, interposition, and texture gradients. The depth map is an approximation and the results have a certain degree of fuzziness applied to smooth out imperfections. Inpainting or Gap-Filling is then used to fill in the parts of the derived images not visible in the reference photograph.
A limited 'Use Case': In the world of the Skilled Stereo Photographer there are limited situations when mismatches in the captured left and right photographs that make up a stereogram are too big to adjust or where one of the photographs has been lost or is unusable, and the only means of recovering an acceptable stereogram is to perform 2D to 3D conversion, treating the best of photographs as the reference photograph. When this is required, the most common method used is depth-based conversion.

The skill differential between "Real Stereoscopic Photograph Capture" and "Monoscopic Photograph Capture + 2D to 3D Depth-Based Conversion"
Artisanal Indifference: The adjective "artisanal" is often used in describing hand-processing in contrast to an industrial process. The use of 2D to 3D Depth-Based Conversion is a short-cut and removes the skill required to capture a real digital stereoscopic photograph and replaces it with an automated un-skilled imitation. Artisans practiced a craft and through experience and aptitude reach the expressive levels of a master. 2D to 3D Depth-Based Conversions are not, and never will be, the work of a master worthy of honouring in an exhibition.
PSA Exhibition Standards - Rules for Exhibitions with closing dates in 2025 specifically excludes the entering of conversions:
ES-H7 Consistent with the statement on Artificial Intelligence, each image in a pair of 3D images submitted to a PSA approved 3D Exhibition should be created with light capture. Depth in a pair of images must be created photographically. Computer generated depth (i.e., 2D to 3D Conversion) or depth obtained by means other than photographically (e.g., Lidar scanning, etc.) are not allowed.
2D to 3D Depth-Based Conversion: Most semiautomatic methods of stereo conversion use artificial intelligence (ai) derived depth maps and depth-image-based rendering.
Depth-based conversion uses a separate auxiliary picture known as the "depth map" that indicate depths of objects present in the scene. The depth map is a separate grayscale ai derived image having the same dimensions as the original 2D photograph, with various shades of grey to indicate the depth of every part of the frame. While depth mapping can produce a fairly potent illusion of 3D, it inherently does not support semi-transparent objects or areas, nor can it represent occluded surfaces.

The above diagram shows how the workflow for 2D to 3D Depth-Based Conversion varies from normal stereoscopic photograph capture in that it invariably relies on AI to create a Depth Map and on Inpainting or Gap-Filling to create the derived images.
- The major steps of depth-based conversion methods are:
- Depth budget allocation. How much total depth is in the scene and where the screen plane will be.
- Image segmentation. Each important surface should be isolated. The level of detail dependent on the required conversion quality and budget.
- Depth map creation. Each isolated surface should be assigned a depth map. The separate depth maps should be composed into a scene depth map. This is an iterative process requiring adjustment of objects, shapes, depth, and visualization of intermediate results in stereo. Depth micro-relief, 3D shape is added to most important surfaces to prevent the "cardboard" effect when stereo imagery looks like a combination of flat images just set at different depths.
- Stereo generation based on 2D + Depth When the process is complete, left and right derived images will have been created.
- Reconstruction and painting of any uncovered areas not filled by the stereo generator.
The most time-consuming steps are image segmentation, depth map creation and uncovered area filling. The latter is especially important for the highest quality conversion.
Multi-layering: A development on depth mapping, multi-layering works around the limitations of depth mapping by introducing several layers of grayscale depth masks to implement limited semi-transparency. Similar to a simple technique, multi-layering involves applying a depth map to more than one "slice" of the flat image, resulting in a much better approximation of depth and protrusion. The more layers processed, the higher the quality of 3D illusion tends to be.
Binocular disparity can also be derived from simple geometry. The more the lines converge, the farther away they appear to be. So, for depth map, the area between two neighbouring vanishing lines can be approximated with a gradient plane.
- Common Conversion Artifacts:
- Cardboard effect. is a phenomenon in which 3D objects located at different depths appear flat to the audience, as if they were made of cardboard, while the relative depth between the objects is preserved.
- Edge sharpness mismatch. this artifact may appear due to a blurred depth map at the boundaries of objects. The border becomes precise in one view and blurred in another. The edge-sharpness mismatch artifact is typically caused by the following:
- Lack of proper treatment of semitransparent edges, potentially resulting in edge doubling or ghosting.
- Simple occlusion-filling techniques leading to stretching artifacts near object edges.
- Stuck to background objects this error of "sticking" foreground objects to the background.
2D to 3D Depth-Based Conversion Workflow
(step 1 - Reference Photograph)
Identify the reference photograph that you want to convert into a stereogram.
(step 2a - Generate a Depth Map Online)
")
Use a web browser to launch an available Depth Map Generating websites. Generating your depth map is as simple as dragging and dropping your reference photograph on the appropriate zone. Initiate the generation by submitting your photograph and wait for the generation to complete. Once completed, download the .png file(s).
https://huggingface.co/spaces?q=depth+estimation (many models available)
https://huggingface.co/spaces/depth-anything/Depth-Anything-V2
https://huggingface.co/spaces/prs-eth/marigold (free)
https://huggingface.co/spaces/shariqfarooq/ZoeDepth/ (free)
https://imageamigo.com/photodepth/ (free + ads everywhere)
https://www.immersity.ai/products (not free)
(step 2b - Generate a Depth Map with Photoshop Depth Blur Neural Filter)

For those with a subscription to Photoshop. Generating your depth map is as simple as opening the reference photograph and then opening the Neural Filters panel. Select the Depth Blur filter. Use the Focal distance and Focal range sliders to configure the map. Select the 'Output depth map only' to view the depth map. If you are satisfied, then click on the OK button to close the Neural Filters panel. Save the depth map as a .tiff file.
(step 3 - Open in Stereo PhotoMaker)
Launch Stereo PhotoMaker and use the Open Left/Right image option in the File menu (shortcut 'O'). Make sure to choose your reference photograph as the Left image and the Depth Map .png file as the Right image. Once the photograph and depth map are displayed, use the "Edit->Depth map-> Create 3D image from 2D+Depth map" option (shortcut 'Alt+D') to open the conversion window. Set the Deviation to 33 (3.3% of image) and use the F/R Position function to select the Front Position value by clicking on the closest object in the Depth map (255). If your Depth map uses white to indicate the Front side and black to indicate the Back side, select the Depth map checkbox. Click on the 'OK' button to generate the stereogram. Align the derived images as required using the Auto or manual alignment options.
(step 4 - Save your 2D to 3D Depth-Based Conversion)
Set the view back to Side-by-side and use the "File->Save stereo image" option (shortcut 'S') to save your 2D to 3D Depth-Based Conversion
Submitting a 2D to 3D Depth-Based converted image may give a photographer an unfair advantage in judged 3D Photography Exhibitions/Competitions
With real digital stereoscopic photograph capture, the interocular distance is set at the time of photograph capture and is immutable, so taking an photograph with an optimised interocular distance for the subject matter at hand is a critical part of the stereo photographers' skill. Replacing this immutable physical interocular distance with a variable virtual interocular distance than can be 'dialled up' in post-production lets the creator of a 2D to 3D converted image step around this skill requirement that is one of the factors judged in 3D Exhibitions/Competitions. It may give a photographer who submits a 2D to 3D Depth-Based converted image an immediate advantage.
Submitting a 2D to 3D converted image to a Real Digital Stereoscopic Photography Exhibition is ethically unsound as it is analogous with the use of performance enhancing drugs in competitive sport where they may give an athlete an unfair advantage. Where 2D to 3D AI generated stereogram submission is allowed they should be judged in a separate category from traditional stereograms captured as separate left and right photographs as the skill required to set the optimal interaxial separation between the lenses when capturing the photographs has been eliminated and the playing field is no longer equal. They should not receive PSA awards or recognition.
- Viewer Quick Reference (click/tap to show)
| Menu | Dropdown | Key | Function |
|---|---|---|---|
| Full | Enter | Full-Screen mode (if supported by your browser) | |
| Size | |||
| Fit | F | Fit to Screen size | |
| - | - | Zoom out | |
| + | + | Zoom in | |
| Stereo | S | Dropdown menu for the stereo viewing method |
|
| SBS | Side by side (Computer monitor, Tablet, Large Print or Smart Phone 3D and VR Viewers) | ||
| LR/RL | Stacked SBS for Parallel/Cross view (free-viewing) | ||
| Colour | Colour Anaglyph (Red-Cyan glasses required) | ||
| H_Int. | Column Interlaced (Passive 3D monitor and Circular Polarised glasses required) | ||
| 2D | Single Image View | ||
| <- | Back space | Previous Image | |
| -> | Space Bar | Next Image | |
| M | Show/Hide menu buttons |

Click or tap on any photograph showing this icon to launch the HTML5 Stereo Viewer
Conversion Examples from different Depth Map generators
Three of the images below are examples of 2D to 3D conversion of old Zac. Deaf as a post and certifiably insane, Zac lived to the ripe old age of 22 years.
Note the increasing edge sharpness mismatch in the derived images where it was required to inpaint/infill gaps created during the 2D to 3D depth-based conversion.
 2D Original |
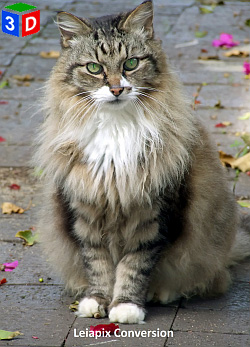 Leiapix Conversion |
 ZoeDepth Conversion |
 Marigold Conversion |
 Photoshop Conversion |
 Imageamigo Photodepth Conversion |
Variable Virtual Interocular Distance Examples
The images below show the effect of increases in the level of deviation set at the time of derived (stereo) image generation in 1.5% increments from 0.0% to 12.0%. These images were generated using the same reference photograph and ai derived depth map.
A value of 3.3% would equate to meeting the 1 in 30 rule ideal.
Note the increasing edge sharpness mismatch in the derived images where it was required to inpaint/infill gaps created during the 2D to 3D depth-based conversion.
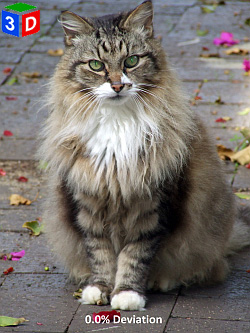 0.0% deviation |
 1.5% deviation |
 3.0% deviation |
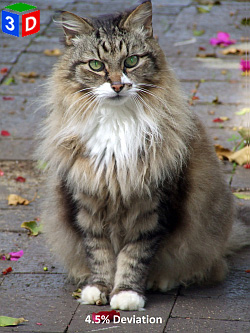 4.5% deviation |
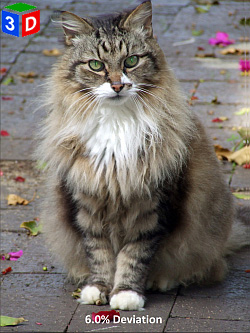 6.0% deviation |
 7.5% deviation |
 9.0% deviation |
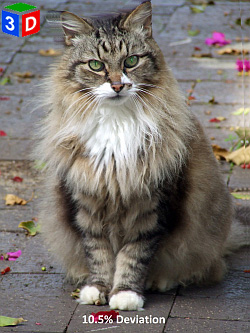 10.5% deviation |
 12.0% deviation |