Working Minimum
The following is a working minimum for the capture, processing and sharing of real digital stereoscopic photographs.
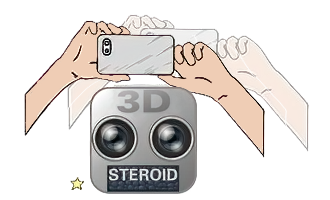
Capture using your Smartphone and 3DSteroid
3DSteroid is a stereoscopic smartphone application developed by the Japanese stereo photographer Masuji Suto. 3DSteroid can be download to your smartphone from either the Google Play or the Apple App Store
This application allows you to make your own real digital stereoscopic photographs using the phones inbuilt camera and the cha-cha method.
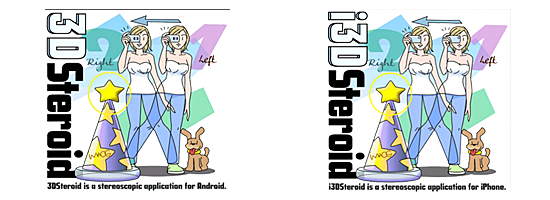
THE CHA-CHA METHOD
This involves standing with your feet slightly apart, but well balanced, and your elbows tight to your sides, with the camera held in the middle. You start by moving your weight on to your left foot (which moves the smartphone camera slightly to the left) to take the first photograph. You then move your weight sideways on to your right foot (which moves the smartphone camera to the right) and take the second photograph.
TAKING THE PHOTOGRAPHS
When you first open the application, a screen is shown with a camera icon in the top right corner. Press or tap on this icon to start taking your photographs. This can be in landscape or portrait format depending on the orientation of your phone.
Try to keep the camera as level as possible, both horizontally and vertically, between the two photographs. Moving slightly closer, or skewing the camera, between shots can sometimes cause a stereogram to be unusable.
Once the first photograph is taken, you will see a ghost of it whilst you line up and take the second photograph. This is to help with alignment and to see the separation of the photographs.
Check when people, vehicles, clouds, animals, etc. are in shot for movement. This can be very distracting when trying to fuse two photographs showing different movements into one 3-D photograph.
A general rule of thumb for comfortable 3-D viewing is to move from left to right 1/30th of the distance between you and the closest subject to avoid excessive background deviation. For close subjects this movement can be as small as 0.5cm for an object 15cm away. It's a balancing act and what displays well on a small screen may not display well on a larger screen.
The application is usually set by default to automatically align the photographs as soon as they are taken (this can be changed in the settings) and the application will display the deviation (the ideal amount being 3.3%).
SAVING YOUR STEREOGRAM
If you are happy with the aligned photographs, you can save them as a stereogram to your phone by clicking on the 'Menu' icon (top left), and then on save.
Capture using an XREAL Beam Pro Stereo Camera
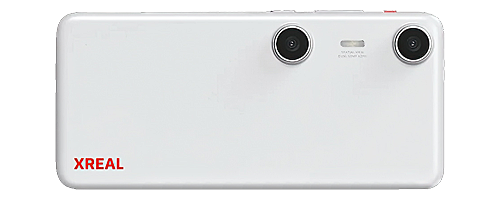
The XREAL Beam Pro is an Android device that looks and works like a smartphone but is intended to be used mostly as a companion to XREAL's AR glasses. The base version has 128GB of storage and 6GB of RAM, and the higher version has 256GB of storage and 8GB of RAM. It has a 1T Micro SD card slot, 6.5 inch full touch screen and dual USB-C ports (one for connecting the AR glasses)
This cameras is not readily available in Australia but can be obtained online. Models with 256GB of storage and 8GB of RAM are the preferred choice.
| Specification | Value |
|---|---|
| Lens Separation | 50mm |
| Aperture | f/2.2 |
| Focal Length | 3.0 mm (equivalent to 18mm) |
| Pixels | 11 megapixels per eye |
| ISO | Auto (50 - 3480) |
| Shutter Speed | 1/8 sec to 1/800 sec |
| Photo Resolution | 7680 x 2880 SBS |
| Video Resolution | 3840 x 1920@30/60fps SBS |
| Image Format | Photo - JPEG, Video - MP4 |
| White Balance | Auto |
| Sensors | Proximity, ambient light, accelerometer, gyro and compass |
| Focus | Fixed focus in 3D |
| Interface | USB Type-C |
Capture using an Acer SpatialLabs Eyes Stereo Camera
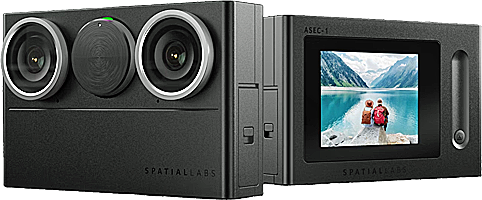
The Acer SpatialLabs Eyes Stereo Camera is designed for photographers, allowing them to capture and view stereoscopic images in immersive 3D with compatibility with Acer's SpatialLabs suite of devices. It features 8 megapixels (MP) per eye resolution, built-in selfie mirror, and weatherproof exterior, and offers auto and touch focus capabilities, Electronic Image Stabilization (EIS), and manual mode for more experienced photographers
This cameras is hard to obtain with only limited numbers being sporadically available in a few countries. There have been issues reported with the formation of condensation (in both lenses) between the outer protective glass layer and the front lens element when warming up from cold conditions (5 deg C). Images taken after the condensation occured included weird speckles on both the right and left halves of images rendering them unusable. Poorer than expected battery life has also been reported (120 versus the expected 180 per charge). It is recommended that you need to have a power bank with you on excusions to recharge this camere every now and then, especially if you are capturing video.
| Specification | Value |
|---|---|
| Lens Separation | 63mm |
| Aperture | f/2.0 |
| Focal Length | 3.0 mm (equivalent to 21mm) |
| Field of view (FOV) | 80°(H) x 52°(V) |
| Pixels | 8 megapixels per eye |
| Shutter Speed | 1 sec to 1/2000 sec |
| Photo Resolution | 2 photo modes: 7680 x 2160 (SBS or SBS + L + R) 3840 x 2160 (SBS or SBS + L + R) |
| Video Resolution | 3 video recording modes: 7680 x 2160@30 SBS 3840 x 2160@60 SBS 3840 x 2160@30 SBS (+HDR) |
| Stereo Webcam Resolution | 2 stereo webcam modes: 3840 x 2160@60 SBS 3840 x 2160@30 SBS (+HDR) |
| Image Format | Photo - JPEG, Video - MP4 - 60Mbps - H.264 |
| Audio Format | AAC |
| Exposure Compensation | -2EV to +2EV |
| Metering Mode | Multi (center AF), Spot (touch focus point link) |
| White Balance | Auto, Manual (2300K~10000K) |
| ISO | Auto, Manual (100 ~ 1600) |
| Best distance from subject | 50 cm ~ Infinity |
| Stabilization | Built-in 6-axis gyroscopic stabilization, Supports IMU stabilization, Video mode is EIS |
| Interface | USB Type-C |
| Memory Card | Micro SDcard, U1 speed and above (U3 recommened) |
| Battery Capacity (Built in) | 1500 mAh (minimum: 1480 mAh, typical: 1515 mAh) |
| Battery Consumption | Photo : Up to180 pictures, Video : Up to 45 minutes |
Capture using a Fujifilm FinePix Real 3D W3 Camera

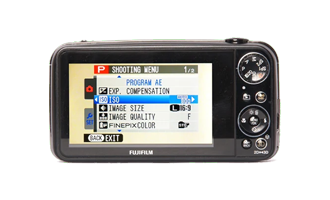
This purpose-built consumer-level digital 3D camera is probably the best option for a new starter to use for capturing real digital stereoscopic photographs without the complication of setting up a paired camera rig. The camera has been out-of-production since March 2013 and whilst you can still find used versions online and in second-hand markets, you need to be careful of price. $300 AUD is a fair price for one in near new condition. These cameras were once bundled with new LG 3D Televisions and were not heavily used by consumers who had no guidance on how to create, process or share real digital stereoscopic photographs. Their photographs, more often than not, caused them or their viewers headaches, meaning that within a short time these cameras were put aside and forgotten.
When using this camera, it is important that you change its settings to the following values to get the best results.
| Specification | Value |
|---|---|
| Lens Separation | 75mm |
| Aperture | F3.7–4.2 |
| Focal Length | 35–105 mm in 35 mm equiv. |
| Pixels | 10 megapixels per eye |
| Shutter Speed | 1/4 - 1/1000 sec |
| Aspect Ratio | 4:3, 16:9 |
| Photo Resolution | 3648 x 2736, 3648 x 2432, 3584 x 2016, 2592 x 1944, 2592 x 1728, 2560 x 1440, 2048 x 1536, 2016 x 1344, 1920 x 1080 |
| Video Resolution | 1280 x 720 (24 fps), 640 x 480 (30 fps), 320 x 240 (30 fps) |
| Image Format | JPEG (DCF / Exif 2.3) / MPO |
| Audio Format | Stereo |
| Exposure Compensation | ±2 (at 1/3 EV steps) |
| AF Metering | 256 segment Contrast Detect TTL |
| White Balance | Auto, seven manual preset modes for direct sunlight, shade, daylight flourescent, warm white flourescent, cool whit flourescent, incandescent, and underwater lighting |
| ISO | Auto (400), Auto (800), Auto (1600), 100, 200, 400, 800, 1600 |
| Best distance from subject | 2m ~ infinity depending on the amount of zoom |
| Stabilization | None |
| Interface | USB 2.0 (480 Mbit/sec) / HDMI mini |
| Memory Card | 34 MB Internal, SD / SDHC Memory Card |
| Battery Capacity | Li-ion Battery Pack (3.6V, Minimum: 940 mAh) |
| Battery Consumption | 150 pictures (CIPA Standard) / 21 min |
When using this camera, it is important that you change its settings to the following values to get the best results.
| Setting | Best Result Value |
|---|---|
| ISO | 100 |
| Mode | P (Program) |
| Image Size | L 4:3 or 16:9 |
| Image Quality | F (Fine) |
| MPO 3D Rec | MPO |
| Flash | Suppressed |
With the camera settings now set to the best possible values there are some basic guidelines that you should follow to get the best real digital stereoscopic photographs. Read though the guidelines below and whenever possible try to follow them.
Basic Guidelines for capturing good real digital stereoscopic photographs
- Pictures benefit from a "centre of interest". Avoid multiple and equally strong centres of interest that compete for the viewer's attention.
- The "centre of interest" effect is strengthened if other picture elements cause your eyes to move to the centre of interest. This can be especially effective in stereo. If this movement is smooth progression from near too far.
- It helps to have the centre if interest displaced from the centre of the picture frame. Forget the "rule of thirds" or the "golden ratio". Just move the centre of interest off-centre if you can, while also observing other principles of good composition. "Bulls-eye" compositions are only effective in special cases.
- In stereo, the scene should not be flat (without depth). Distant mountains may be pretty in themselves, but a picture of them needs a foreground that is nearer, to help establish scale. A foreground can also lead the eyes to the more distant scene.
- Avoid bright patches that can only be seen by one eye, such as a patch of bright sky seen through leaves or branches.
- Don't forget the rules of good 2D composition, which still apply to stereo.
- Don't be afraid to crop a picture. Less may be more. StereoPhoto Maker makes it so easy in stereo that's it's worth trying.
- The picture edges define the "stereo window" or "frame". This frame has a location in space and is therefore much more a part of the composition element than the frame in 3D photography.
- Consider using nearby objects as a natural frame for the picture, or a partial frame. This is especially effective in stereo, but also in 2D photography.
- Keep it simple. Simple picture elements and simple arrangement of them usually produce a stronger picture. Avoid complex arrangements of things and busy textures unless your theme is complexity.
- Simple geometric arrangements strengthen composition. Diagonals can be effective.
- The "some of the parts" rule. You don't need to see an entire tree to appreciate it as a tree. One side and a trunk are enough. The brain can reconstruct missing parts of familiar objects.
- Picture elements that smoothly lead the eye from near to far can add interest. Geometric "S" shapes are usually stronger picture elements.
- Stereo can bring out distinct differences that would be lost in 2D, especially when objects at different distances have nearly the same tone, colour and texture. But colour differences can still add strength and definition to spatial structure.
- Every rule or guideline can be broken if you have a good reason. The picture may be stronger if it defies expectations.
Capture using a Panasonic Lumix DMC-3D1 Camera
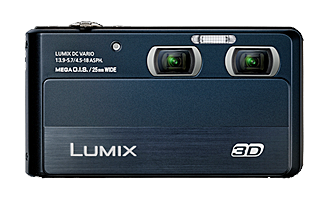
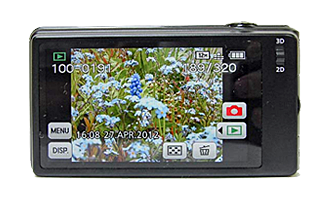
This purpose-built consumer-level digital 3D camera is built around a twin lens design that can record 3D and 2D still images as well as 1080i HD video. The camera's dual 12MP 'High Sensitivity MOS' sensors are powered by a Venus Engine processor and allow the user to capture both 2D stills and HD video simultaneously, with each lens able to focus and zoom independently of one another. The 3D1 captures up to 8fps and features a 3.5" touchscreen. 3D pictures are stored in MPO format. With this camera both MPO images and fine JPEG images are recorded simultaneously. If the distance to the subject is too close, a 3D alert indication appears.
The camera has been out-of-production since 2014 and whilst you can still find used versions online and in second-hand markets, you need to be careful of price. $500 AUD is a fair price for one in near new condition.
| Specification | Value |
|---|---|
| Lens Separation | 27mm |
| Aperture | F3.9 - 5.7 / 2-step (F3.9 / 9.0 (W), F5.7 / 13.0 (T)) |
| Focal Length | [2D] f = 4.5 - 18.0 mm (25 - 100 mm in 35 mm equiv.) [3D] f = 4.5 - 18.0 mm ((16:9): 33 - 132 mm, (4:3): 30 - 120 mm in 35 mm equiv.) |
| Pixels | [2D] 12.1 Megapixels / [3D] 8 Megapixels per eye |
| Shutter Speed | [2D] 8 - 1/1,300 sec (Starry Sky Mode: 15, 30 sec) [3D] 8 - 1/1,300 sec |
| Aspect Ratio | [2D] 4:3, 3:2, 16:9, 1:1 [3D] 4:3, 16:9 |
| Photo Resolution | [2D] 12M (4:3) [3D] 8M per eye (4:3) / 6M per eye (16:9) |
| Video Resolution | [2D] 1,920 x 1,080 pixels, AVCHD 50i (Sensor output is 25fps) 1,280 x 720 pixels, AVCHD 50p (Sensor output is 25fps) 1,920 x 1,080 pixels, MP4 25fps (Sensor output is 25fps) 1,280 x 720 pixels, MP4 25fps (Sensor output is 25fps) [3D] 1,920 x 1,080 pixels, Side by Side 50i |
| Image Format | [2D] JPEG (DCF / Exif 2.3 [3D] JPEG (DCF / Exif 2.3) / MPO |
| Audio Format | Stereo / Mono |
| Exposure Compensation | 1/3 EV Step, ± 2 EV |
| AF Metering | [2D] Face / AF Tracking / 23-area / 1-area / Spot / Touch Area [3D] Face / 23-area / 1-area / Touch Area |
| White Balance | [2D] Auto / Daylight / Cloudy / Shade / Incandescent / White Set [3D] Auto |
| ISO | [2D] Auto / i.ISO / 100 / 200 / 400 / 800 / 1600 / 3200 High Sensitivity Mode (ISO 1600 - 6400) [3D] Auto |
| Best distance from subject | 90 cm - 3.4m ~ infinity depending on the amount of zoom |
| Stabilization | MEGA O.I.S. (On / Off) |
| Interface | USB / HDMI mini |
| Memory Card | Built-in Memory, SD / SDHC / SDXC Memory Card |
| Battery Capacity | Li-ion Battery Pack (3.6V, Minimum: 895 mAh) |
| Battery Consumption | 200 pictures (CIPA Standard) / [2D] 25 min [3D] 30 min |
Processing using StereoPhoto Maker, 3DSteroid Pro (Android) or i3DSteroid (Apple)


Without exception, all captured real digital stereoscopic photographs require some amount of post capture processing. Setting up a consistent processing workflow cannot be understated.
If you are only using a Smartphone, the 3DSteroid Pro or i3DSteroid Application contains automated and manual tools to align your left and right photographs to prepare them for viewing. If you are going to transfer your images to another device such as a personal computer, then using StereoPhoto Maker (SPM) is recommended.
Using StereoPhoto Maker (SPM) to process your photographs on a personal computer
An important part of your processing workflow is about keeping your files organised. With each batch of captured photographs that you process, at a minimum you should create three folders.
The first is a parent folder which can either have a meaningful name or simply the date in yyyymmdd format. Personally, I use the date format as it keeps my photographs in chronological order.
Inside this parent folder are at least two folders: [source] (for the original photographs from the SD card) and [adjusted] (for the adjusted/processed photographs). You may like to add an additional folder called [mpo] (for photographs saved using the Multi Picture Object format) is useful if you plan to view them on an LG Television.
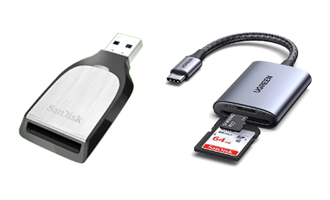
With the folders created, you are ready to upload your digital photographs from your camera. The easiest way to transfer your photographs from the cameras is to remove the SD card and then plug that into an SD card reader attached to your computer to transfer the photographs to the relevant [source] folder. Once the files have been safely transferred you can return the SD Card back to the camera.
Now it's time to process your photographs using the StereoPhoto Maker application
- Use the Multi Job -> Multi Conversion function in SPM to perform a batched automated alignment and colour adjustment of your photograph pairs. Set the output file type to be Side-by-side JPG and the Output folder to be the [adjusted] folder. Click on the "Convert All Files" to process all of your photographs
- Once all of your source photograph files have finished processing, Use the "Open Stereo Image" option in the File menu to open your aligned photographs one at a time. Each photograph should display on screen as separate left and right photographs.
- If you have a monitor capable of displaying horizontally interlaced circularly polarised photographs it's time to put on our circularly polarised glasses. If you only have a normal colour monitor, it's time to put on your Red/Cyan Colour Anaglyph glasses.
- Use the options under the Stereo menu to select the appropriate stereoscopic display option.
- Photographs always need some amount of manual alignment, so when you are ready, take of your glassed and set the stereoscopic display option to Gray Anaglyph. This will allow you to check the alignment of the left and right photographs relative to the stereo window.
- Find the closest object(s) in your photograph and check that it appears to overlayed exactly (appearing only as shades of grey with little to no red or blue areas/edges). If the closest object(s) appear as displaced red and blue photographs, use the left and/or right arrow keys to move them back into alignment. Objects in your photograph that lie behind the closest object will appear as laterally displaced red and blue photographs proportional to their distance or depth in the photograph.
- The same point/edges on the furthest objects in your photograph should not be displayed more than 1/30th of the overall photograph width apart. This is testing the so called 1 in 30 rule which if broken may make your photographs hard to view on larger screens.
- You may notice that after all this alignment that your photographs now have uneven edges (areas where only part of one photograph is showing). If this is true, then use the cropping functions to remove the uneven edges.
- If you are satisfied with the alignment of your photographs then change the stereoscopic display option to Side-by-side and then use the Save Stereo Image menu option to save your aligned stereoscopic photograph in the [adjusted] folder. You are always asked if you want to overwrite an earlier version of your photographs. You can use the spacebar key to move forward to the next photograph. Use the backspace key to move back to the previous photograph.
Sharing as Social Media Attachments and Viewing on
Smartphones with simple VR Adaptors
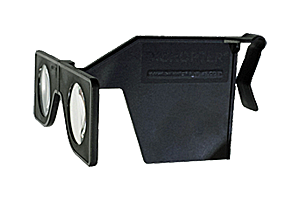
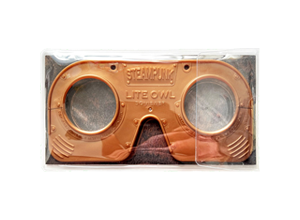

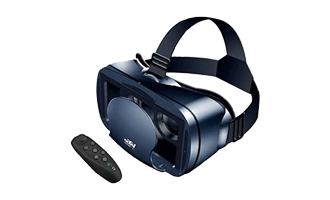
Most modern Smartphones have a means to allow you to upload photographs onto either the phones internal storage or a secondary SD card that has been added to the phone to increase it's storage capacity.
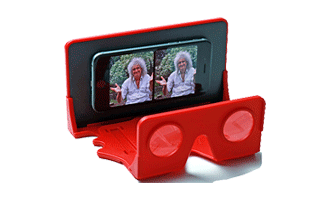
The aim of this next step it to upload/transfer your processed photographs onto your smartphone so that they can be opened and displayed on the phones screen and then viewed using a VR Adaptor attached to the phone.
Once transferred, the photographs can be viewed and enjoyed by anyone present. Some VR Adaptors have adjustment controls to see the effective screen distance and interpupillary distance to suit each viewer.
Side by side photographs viewed using a VR Adaptor and your Smartphone should not be more than 12cm wide (6cm per photograph)
Check that your Smartphone is running at its highest display resolution (the default resolution is normally lower to reduce power consumption) and that the adaptive brightness function (where available) is disabled when using it with a VR Adaptor.
Photographs can be sent in a variety of ways via social media messaging to friends and family who can then use their own VR Adaptor on their smartphone to view the received photographs.
Low-Cost VR Adaptor Feedback
Feedback is based upon actual use of the product with a Google Pixel 7 Pro Smartphone in full resolution mode.
| VR Adaptor | IPD Adj? | DOF Adj? | Comments |
|---|---|---|---|
| London Stereoscopic Company OWL VR Viewer |
N | Y | Good Visual Result Good Lens quality - takes a moment learn how to use Best suited for photographs presented 70mm apart (stereo card format) Suitable for use with wider smartphones Photographs can be changed without removing phone No chromatic aberration |
| DiChopter 3D Viewer |
N | Y | Good Visual Result Foldable clip-on viewer Good Lens quality - easy to use Best suited for photographs presented 65mm apart/wide Photographs can be changed without removing from phone No chromatic aberration |
| London Stereoscopic Company Steampunk Lite OWL |
N | Y | Good Visual Result Pocket portable lorgnette style (hand held) viewer. Good focus - takes a moment learn how to use Best suited for photographs presented 70cm apart (stereo card format) Suitable for use with wider smartphones No chromatic aberration |
| VRG 3D VR Headset Pro with Remote Controller |
Y | Y | Good for handheld viewing Good focus and wide FOV Suitable for use with wider smartphones Requires phone removal to change photograph (unless using slideshow mode) Some chromatic aberration at edges |
| MS3D Mobile Phone Glasses |
N | Y | Good Visual Result Foldable clip-on viewer Good Lens quality - care needed to attach to phone Not suited for photographs presented >65mm apart/wide Photographs can be changed without removing from phone No chromatic aberration |
| VR Fold Phone Glasses |
Y | Y | Variable Visual Result with blurring at the edges Foldable clip-on viewer Cheap give-away for interested onlookers Not suited for photographs presented >65mm apart/wide Photographs can be changed without removing from phone Green chromatic aberration at edges |
| VR Shinecon G05A Glasses (including variants) |
Y | Y | Not Acceptable Focal length issues requiring viewer to be held away from face to focus Narrow FOV, Limited range of IPD Adjustment (65mm or less) Only suitable for use with small screen smartphones/children |
Use of these products with smartphones with higher screen resolutions such as a Sony Xperia XZ Premium locked in 4K Mode gives the best results.
...
Jeff Ewen 3D - creating real digital stereoscopic photographs.
Contact me by clicking here.